
In my last post, I talked about how to declutter your space to make room for a home gym or a dedicated fitness area (there are many other reasons you might want to do so, but for our purposes we’re making space for a home gym). You’ve done a great job of sorting the stuff you plan to keep, and here we will talk about how to properly store it. But first, we will discuss what to do with the pile of stuff you plan to Get Rid Of.
Don’t Wait – Get Rid of It!
Once you have made the decision to get rid of something, get rid of it – otherwise you are just storing it. There are a couple different ways you can handle the stuff you plan to Get Rid Of. Anything that is useless, broken, or just plain junk that you haven’t already thrown in the trash should go there now (or the recycle bin if applicable). Next, give anything you decided to give to someone else (like a sibling or your children) to that person. Then you may want to try to sell the rest of the stuff that’s still good – consider a garage sale or any of the various resale shops in your area. Finally, anything that doesn’t sell should be donated to charity.
There are a lot of great charities out there, but not many of them are prepared or equipped to handle donated items. Goodwill and Salvation Army are the two best known, but many more have their own resale shops as well. If you have any concerns about a specific charity, just do some research, or better yet volunteering with them can help you feel confident your donations will help a worthy cause. But beware of charity reviews you may find on social media such as the chart below which is full of errors:

I’m not going to address everything here, just a couple examples from the chart (remember, I worked in non-profits for 16 years, but not actually for any of the ones listed). The salaries listed in the top row are all inaccurate, many of them grossly so. If you give to the United Way, remember that they are an organization that serves as a passthrough for other organizations so you either have no say in the organizations supported by your donations, or if you do designate to a specific organization they will only receive about 80% of your donation with the United Way keeping the rest.
It’s true that Goodwill doesn’t pay for the goods, but the profit isn’t just pocketed by the CEO, roughly 92% of it goes towards employment and training programs for the community. The American Legion Commander may not receive a salary because it is a volunteer position, however the Commander is supported by a paid Adjutant who serves in the CEO role. Should we really believe that there isn’t a single employee at the Ronald MacDonald Houses and that they have no overhead expenses?
The numbers you should really focus on is the percent of budget spent on programs which can be gathered from 990 filings and are available at charitynavigator.org. My caveat to relying on the program expenses for the quality of a charity is that many organizations will include salaries as a program expense (in some I worked for about half of the program expenses were salaries). After all, the cost of paying someone to run a program is an expense of that program.
Get Organized
Hopefully you now have less stuff, and the stuff you do have is much more useful to you. Your next step is to make sure that you are storing your stuff as efficiently as possible. A lot of what I put below may seem like basic common sense, but the science of packaging has expanded to the point that there is at least one university offering a Ph.D. in Packaging!
Your items should be stored in boxes or tubs with other like items. Especially for longer-term storage, you’ll be better served by investing in plastic storage tubs, preferably ones with locking lids, or sturdy boxes of the same size rather than what you can scrounge for free. Quality boxes or tubs will allow for better stacking and durability. Fragile items should be individually wrapped with bubble wrap, foam sheets, packed in foam peanuts, or something similar to prevent damage. Clothing and other fabrics are best stored in vacuum sealed bags which, though expensive, will provide the best protection.
Once your individual boxes or tubs are packed, make sure you label them before you seal them so you can more easily identify the contents without having to open them. Assuming they will be stored in a garage or basement, they should be stacked raised off the ground on boards or pallets. This will allow for better airflow and protect their contents from the temperature changes of the cement floor. If you’re willing to spend the money or the time you are better off buying or building shelving for your boxes or tubs which will allow easier access (you won’t have to move boxes to get to one on the bottom of a stack) and visibility. Most home improvement stores sell utility shelves of varying quality depending on how much you’re willing to spend on them. Or you can custom build shelves to either fit your space, or fit the items you plan to store on them.
Building Your Own Shelving
Pinterest is full of plans for building your own shelves, cabinets, and other methods of storing items. All you really need to do is decide how you want to store your items and how much shelving you need.
 The first option is overhead storage racks. Overhead storage has the distinct advantage of utilizing space which is often wasted (like the area above your garage door) and leaving your floor uncluttered. However, they will undoubtedly require a ladder to get to them making it harder to get to your stuff when you need it and will likely have stricter weight limitations. You also need to be sure that your ceiling is high enough to leave clearance for garage doors and vehicles under the racks.
 Both of my neighbors opted for wall mounted shelves built with 2×4’s and plywood. This is a rather simple process where you mount 2×4’s to your wall as a base and use metal brackets to support a plywood shelf, or you build brackets from 2x4s and mount them directly to the wall as pictured here. These are simple and easy to build with the only challenge being finding the studs to mount the 2x4s to if you are mounting to drywall. The main drawback is, as one of my neighbors has already pointed out, the lack of horizontal support has his plywood sagging between the brackets.
I opted for a more robust option – building a full shelf unit out of 2x4s. I made this decision for two reasons. First, in a new house, I didn’t want to put any holes in the drywall (I filled, patched, and repainted a lot of them in the last house to put it on the market). Second, and most important, this is the third house I have owned, and the third storage unit I have built. The other two were attached to the ceiling or walls and had to be sold with the house. This time I wanted to build something that I could move around in the garage if necessary, or if needed, be disassembled and moved to a new house.
There are hundreds of examples on Pinterest, so following their example I designed a built a freestanding set of shelves 8 feet long and 2 feet deep which can hold 20 storage tubs plus larger storage boxes on the top shelf. The entire process cost less than $150 and was completed over a couple of hours on a weekend. Full details can be found by visiting The Kilted Dad Projects Page or on Pinterest.
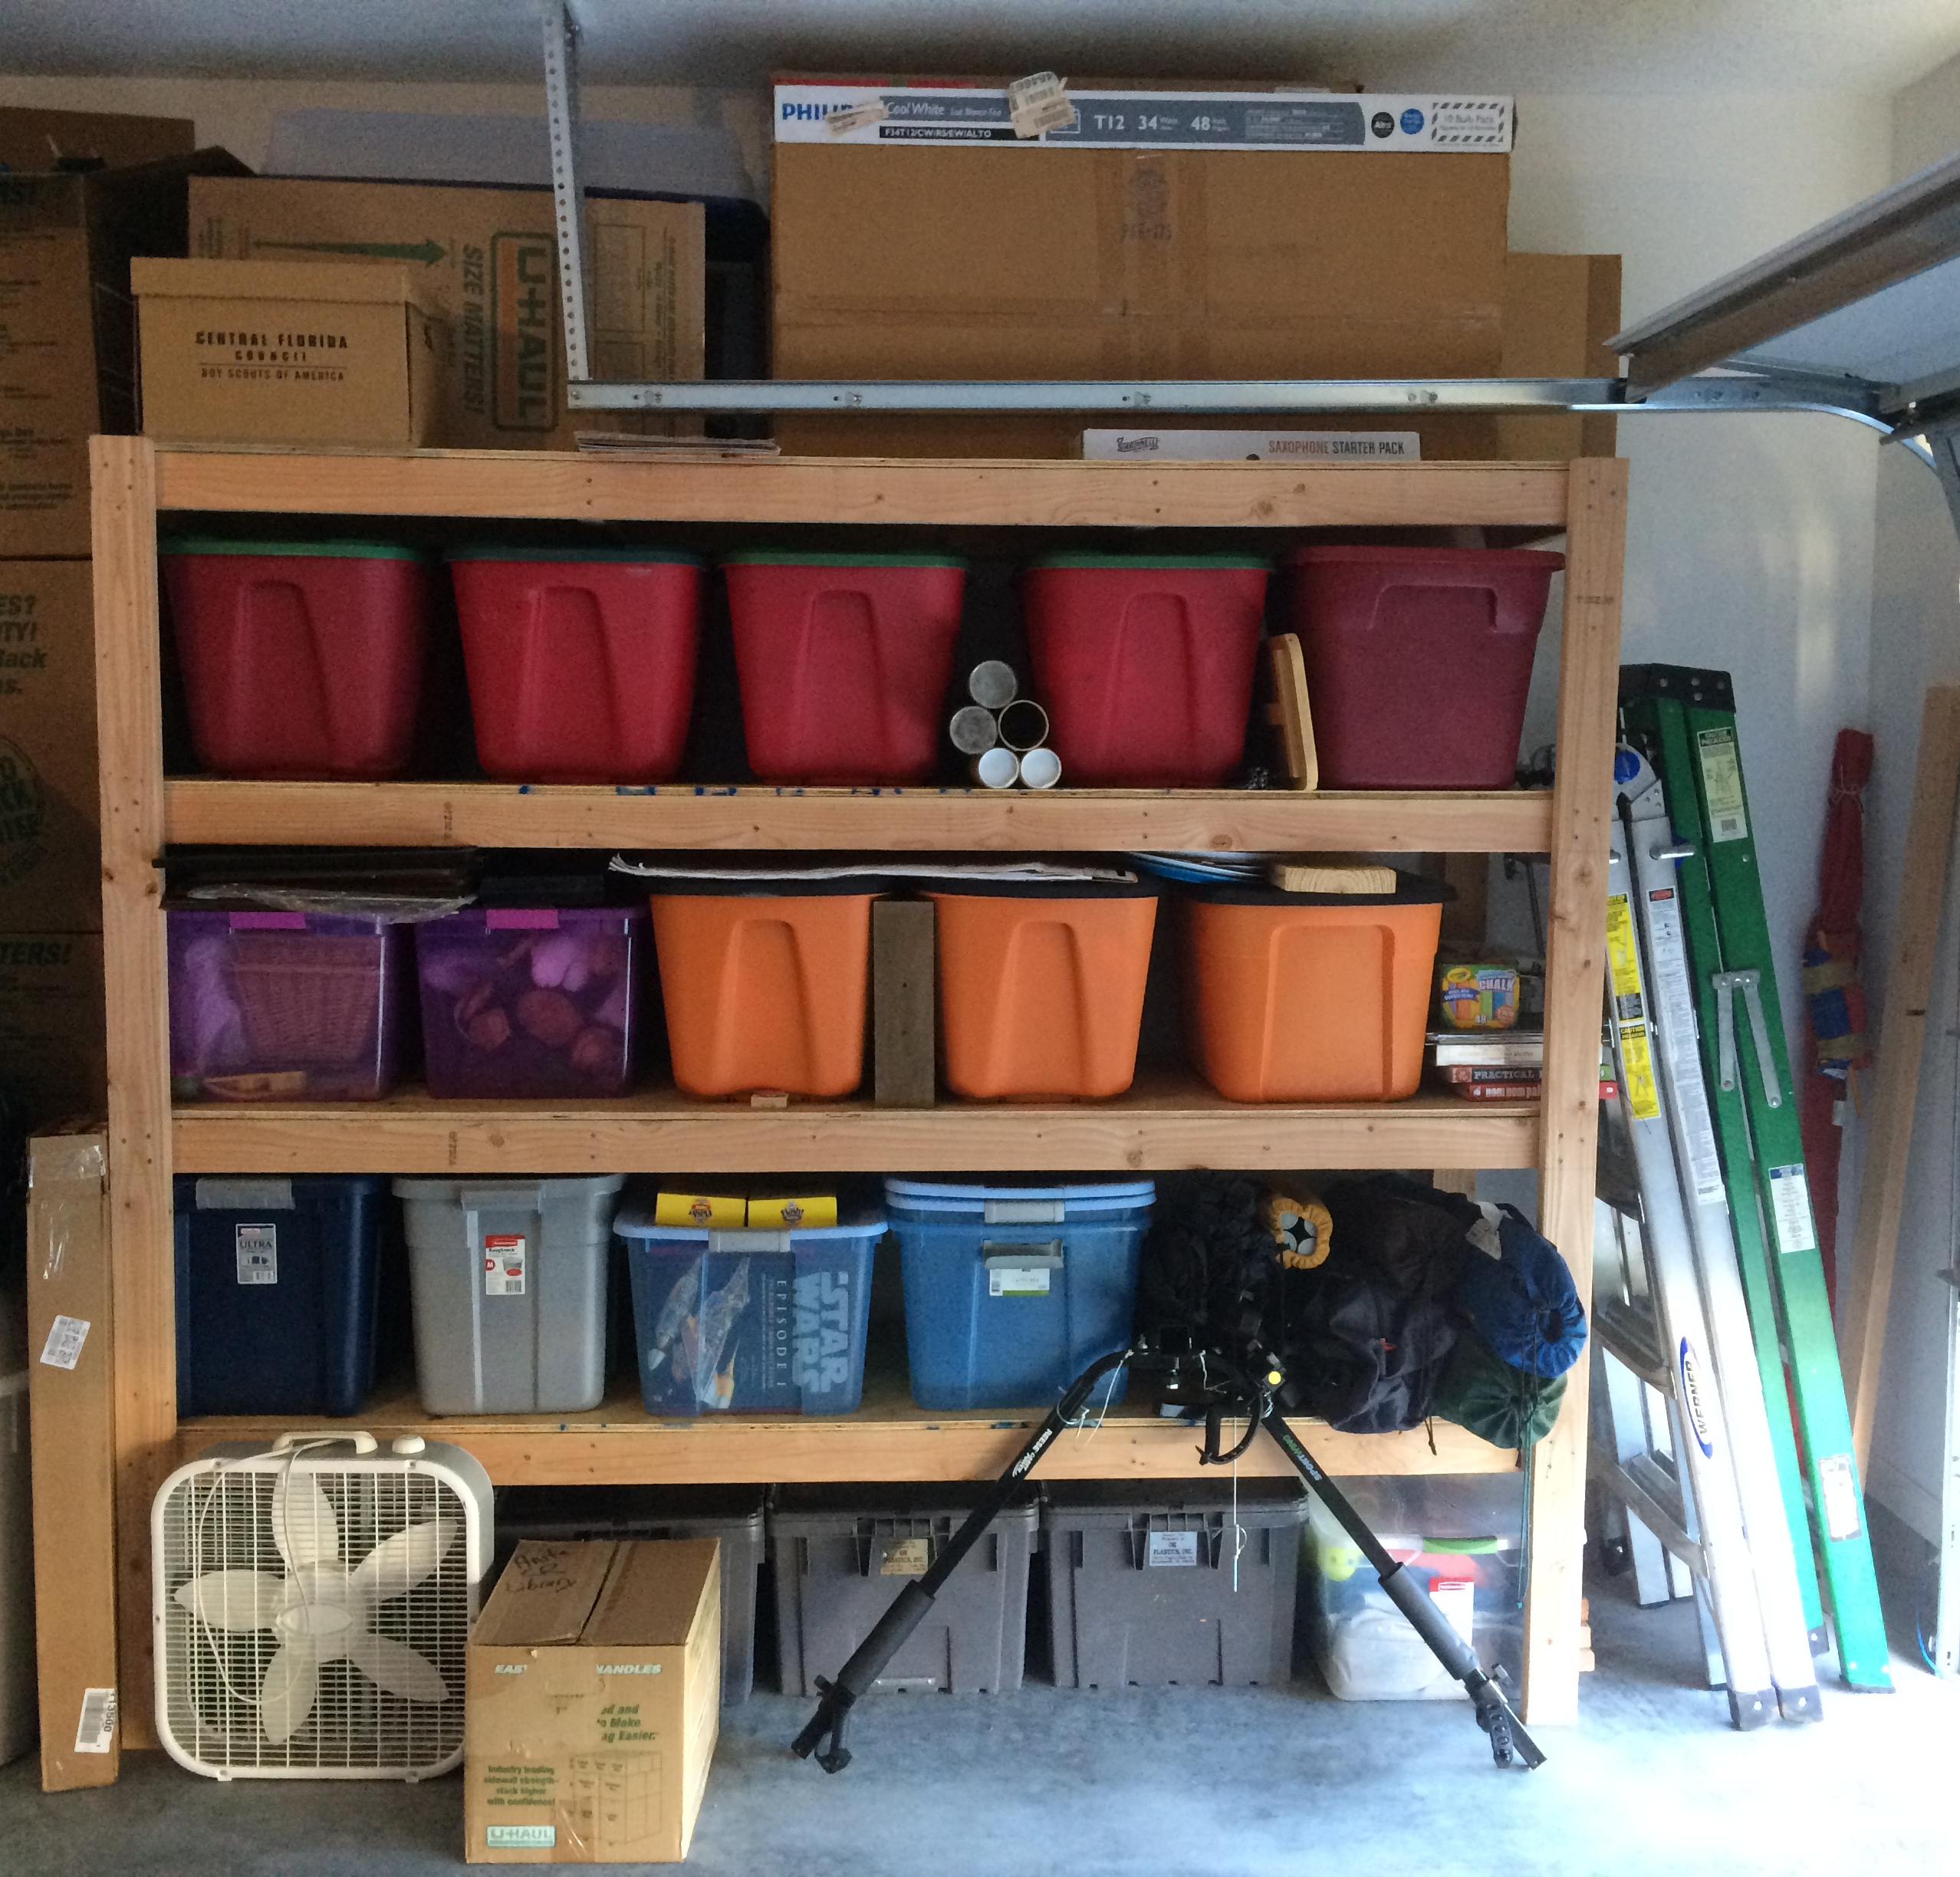
I was initially planning to build 12-16 feet of shelves but opted to start with 8 and see how much we could get on it. As you can see from the picture above, it can hold a lot of tubs, but not everything we have so I still plan to build a shorter one about 5-6 feet long to cover the rest of the wall and store more boxes, but that will come in time. What I did build right after the first shelf was a workbench. It’s probably not sturdy enough to serve a s true “workbench” for any woodworking projects, but it fulfills its intended purpose of holding my tool box and getting all my other tools organized.
What Should I Do With All That Space?
With those projects done and a lot of our stuff sold, donated, or stored properly, more than half of the garage’s floor space is completely empty. This is where we will set up The Kilted Gym. In the next post, I’ll cover all the basics of setting up the gym, what equipment we’ll use, and how we’ll customize our space for fitness.
1 Comment
Comments are closed.